
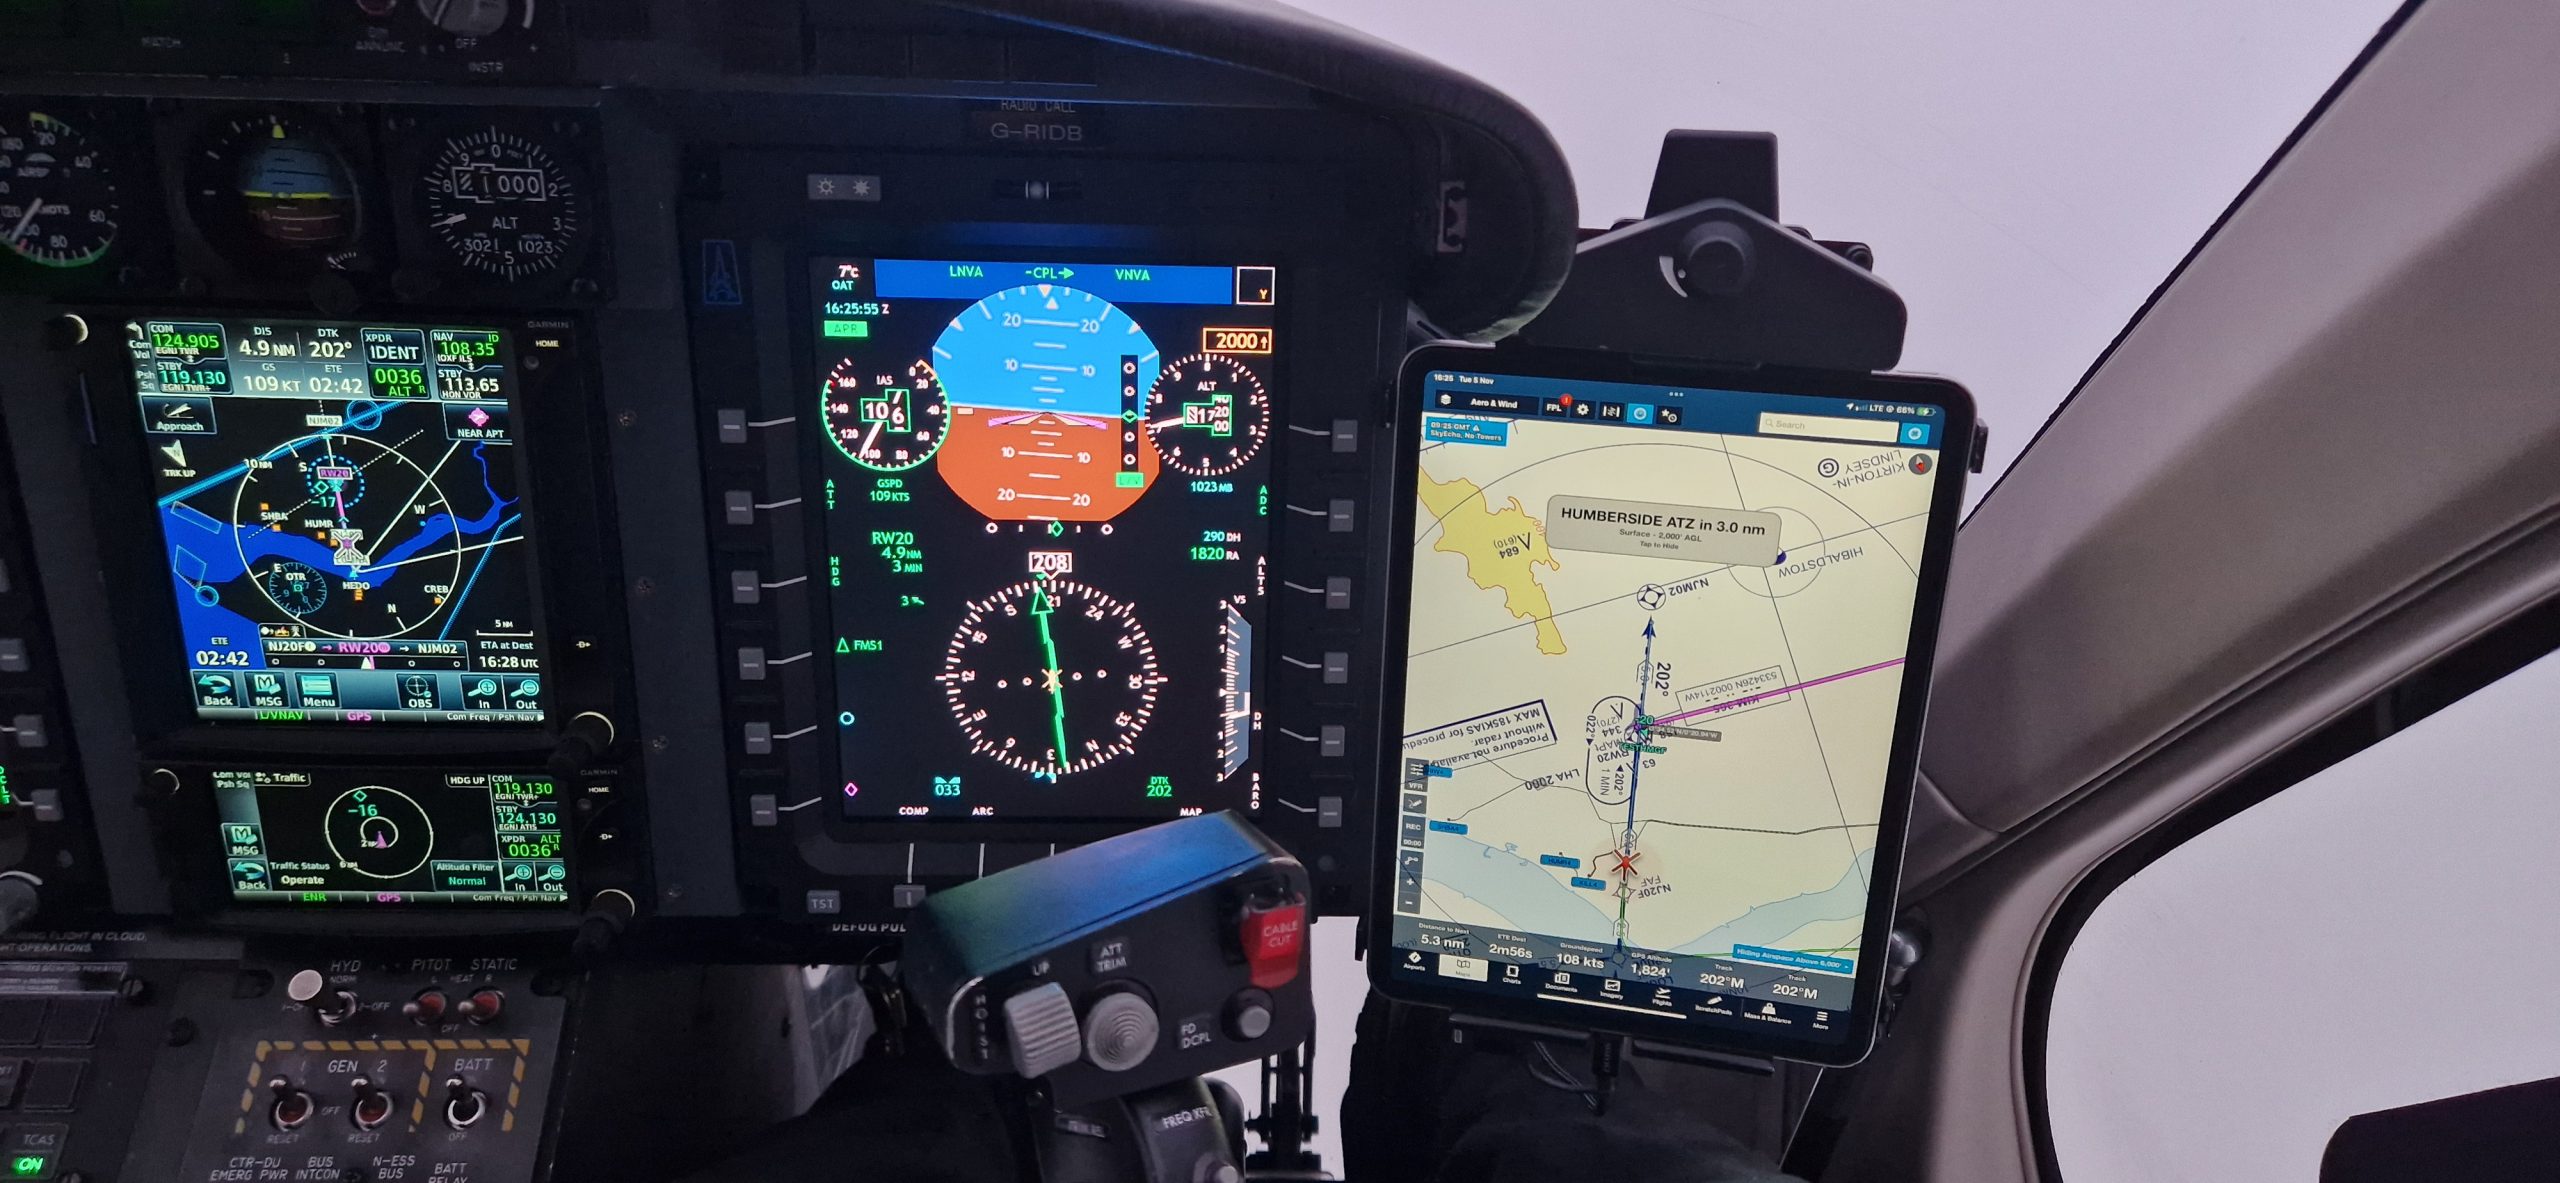
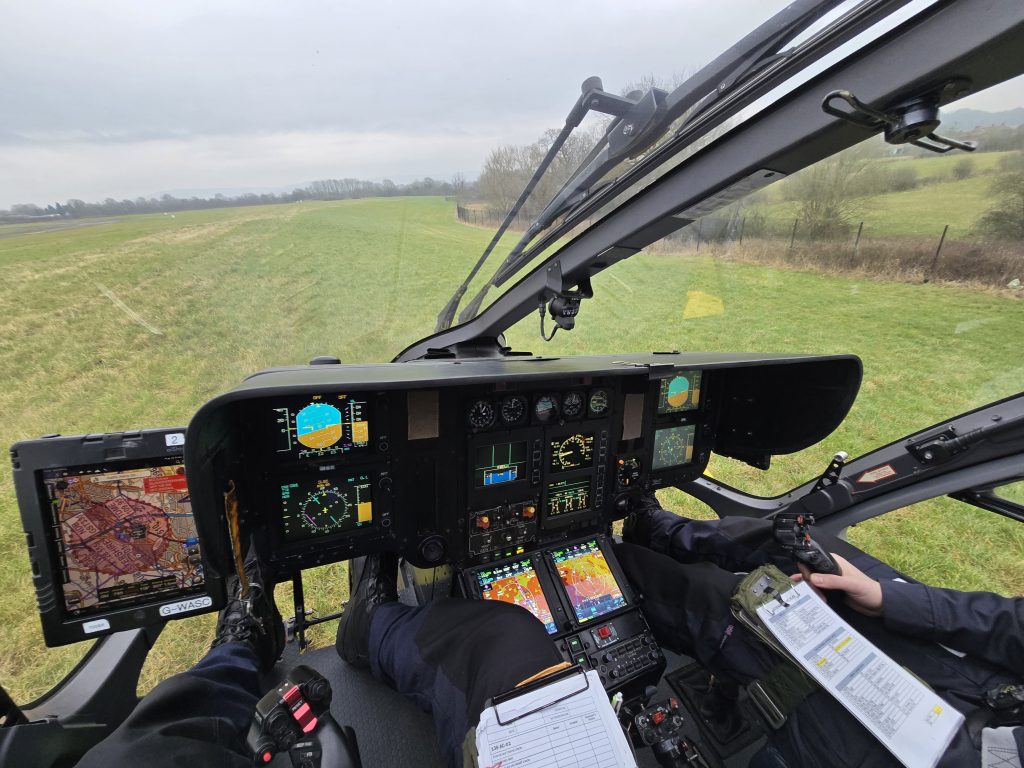
The GTN 750 and the newer GTN 750 Xi are standard equipment in many light twin helicopters. As the main interface for navigation and communications, pilots need to use it effectively. This article covers some tip and tricks to make your life easier and allow you to focus on operating the aircraft.
The topics included in this article range from time savers you will use every trip through tips to avoid confusing problems whilst airborne and finishing with some ideas for more effective training. These are our favourite top ten tips – what are yours?
Contents
Intro
The Garmin GTN 750 and GTN 750 Xi are all-in-one navigation and communication boxes installed in many light twin helicopters. Due to space considerations on some machines, they might be substituted for GTN 650 or GTN 650 Xi which take up half the space. They are in turn successors to the GNS 530/430 navigators with their mysterious knobs that fill GTN 750 pilots with dread when they have to revert to such archaic inputs as a twiddly knob!
The GTN series of navigators have undergone a continuous series of incremental upgrades over their lifetime. The current software versions at the time of writing for the GTN 650/750 and GTN 650/750 Xi are v6.72 and v21.03. Many aircraft do not keep up with the very latest changes and your aircraft may have an older software version. Most of the tips below work in all relatively modern versions of the software. Some of the tips below will only be useful with certain equipment connected or indeed not connected.

With those caveats out of the way lets look at the list!
1 – Don’t type one
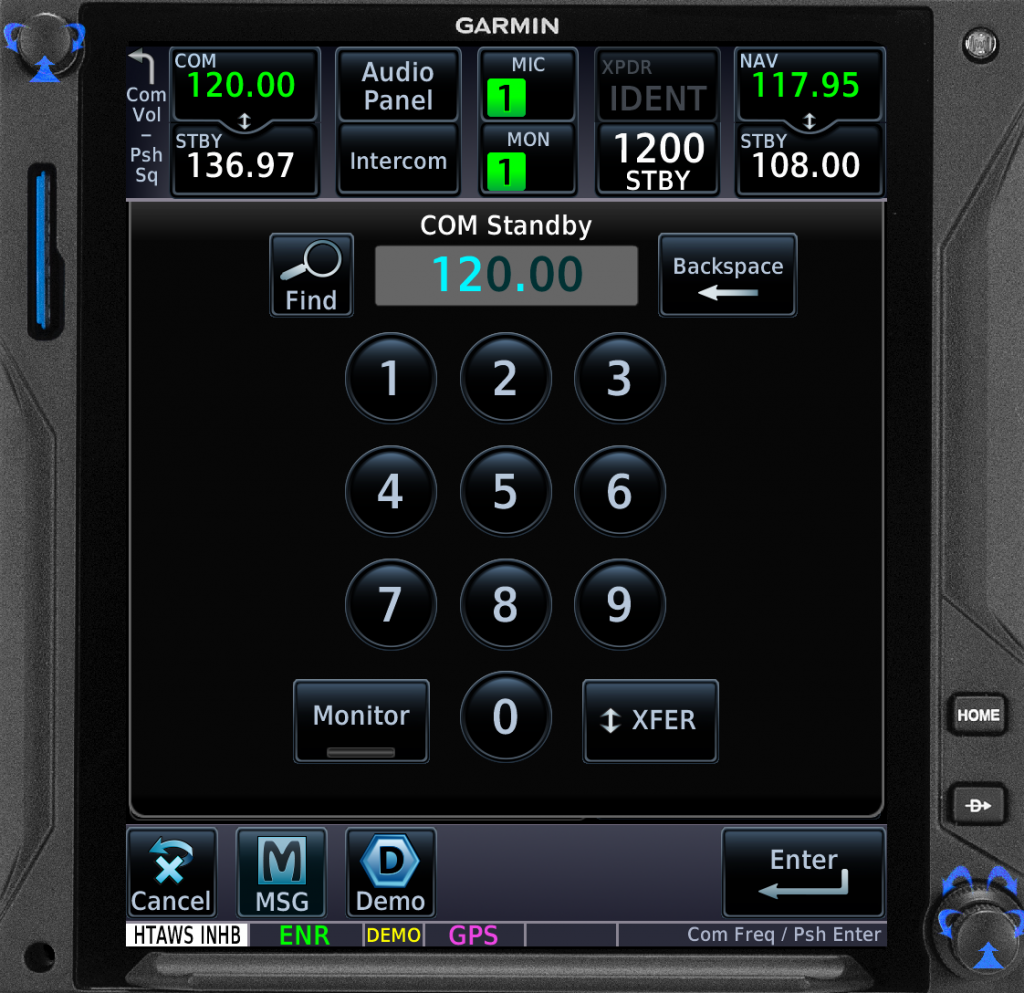
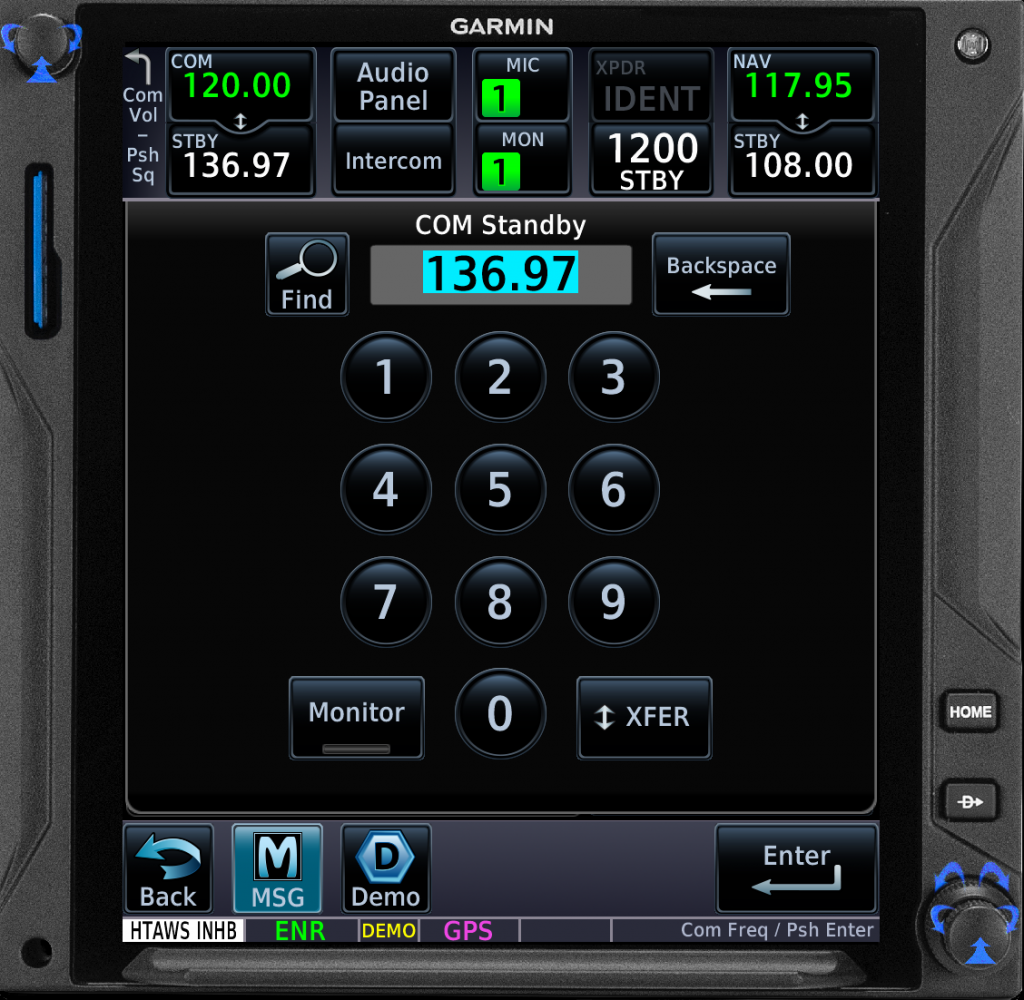
This is not some kind of computer bug but rather a labour saving tip that will literally save you seconds over your lifetime. Each GTN 750/650 includes a VHF radio. These operate over the ATC band between 118 to 136.975 MHz. The channel spacing between radio frequencies is 25 kHz in some places but increasingly it’s 8.33 kHz. In any case, one obvious feature of every single frequency is that it starts with a one. The GTN knows this and will helpfully fill in that one for you.
To enter a VHF frequency you as the pilot therefore only need to enter the remaining numbers. You also do not need to enter the trailing zeros. So taken to the extreme for a frequency of 120.0 MHz you simply enter 2. A frequency of 125.65 becomes 2565. Once you grasp this and do it every time, you will become appreciably faster at entering frequencies.
Except of course, it does not work with the VOR/ILS receiver. This is bizarre omission on Garmin’s part. The VOR/ILS side of the system does however force the pilot to enter a valid VOR/ILS and will not accept a non-sensical frequency (eg 120.0 MHz cannot be entered.
2 – Listen to 4 radios at once
In typical aircraft installations 2 GTN are installed to provide the crew with 2 VHF radios. This typically gives the pilot the capability to talk to 2 agencies at the same time. However, a button on the frequency selection page allows each GTN to monitor transmissions on the standby frequency.
This opens up several possibilities. One regulatory requirement is that all aircraft should monitor Guard on 121.5 MHz where possible (some aircraft must monitor guard). In addition, for aircraft operating in the cluttered low level environment might be well served in monitoring a suitable flight safety frequency (eg Low Level Common 130.490 MHz in UK airpsace). Alternatively it could be used for Frequency Monitoring when operating near busy airspace.
This monitor option is not without issues however. Should the monitored frequency be busy or subject to interference it might be very frustrating and distracting to listen to.
3 – Waypoints as airports
The GTN series navigators allow pilots to enter custom waypoints. There are several ways to achieve this in typical Garmin fashion, but an option exists to designate the new waypoint as an airport. This might seem pointless but it has a hidden function.
On many helicopters, the GTN provides an HTAWS function which provides alerts of proximity to terrain or obstacles. These alerts would be quite distracting when you are intentionally descending into or climbing out of an airport. With this in mind, HTAWS automatically reduces it’s alerting threshold around airports, reducing false alerts whilst still providing some protection.
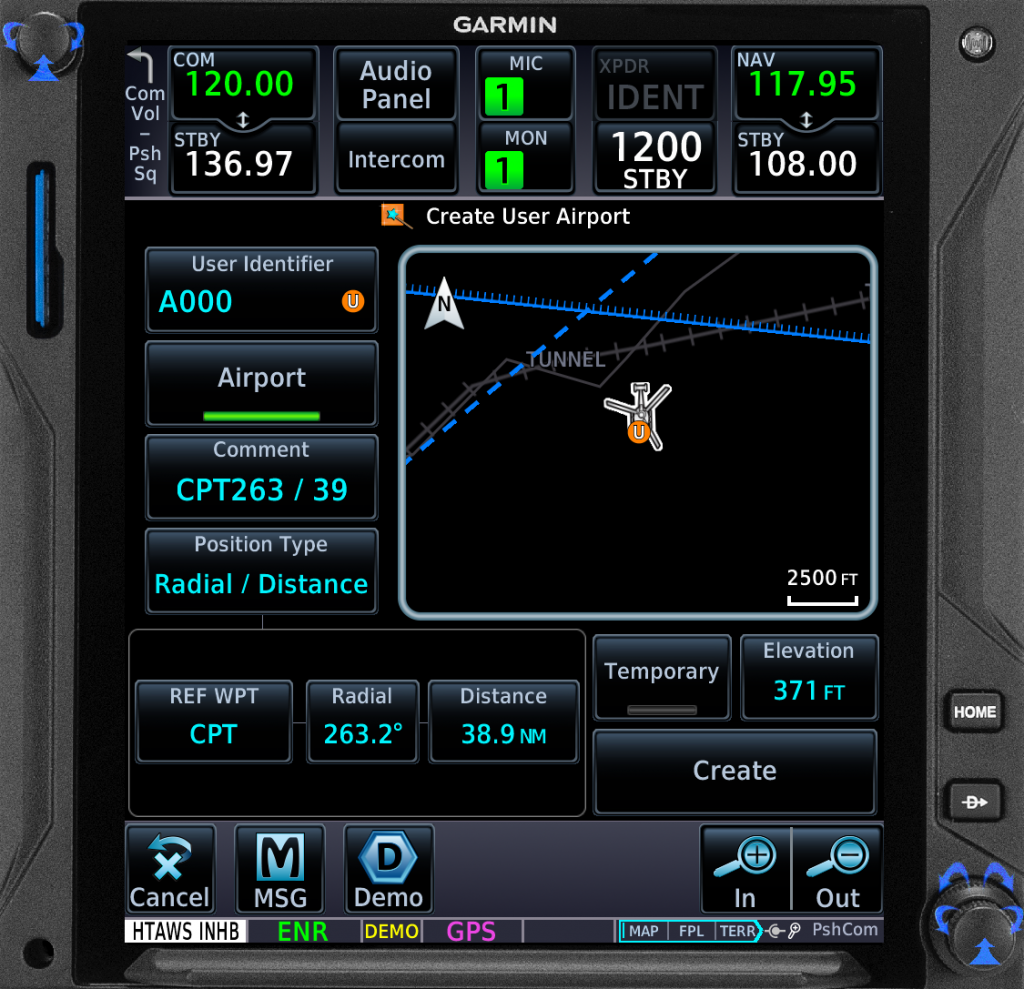
Designating a user waypoint as an airfield provides similar automatic reduced alerting of HTAWS. This could be very helpful for designated Company landing sites or even ad-hoc HEMS landing sites. Slightly counter-intuitively the waypoint gets a little white U when it is designated as an Airport (presumably as it is a user airport).
4 – Buttons as shortcuts
At the top of the GTN screen is the Comm/Nav bar with the VHF radio frequencies top left and the VOR/ILS frequencies top right. To the right of centre is the transponder but on the left are 4 user-configurable boxes (except aircraft which use the GTN as the intercom controller).
These user-configurable boxes are typically set to show navigation related data such as track and distance to go. But they can be much more useful than that. You can configure these boxes to be shortcuts.
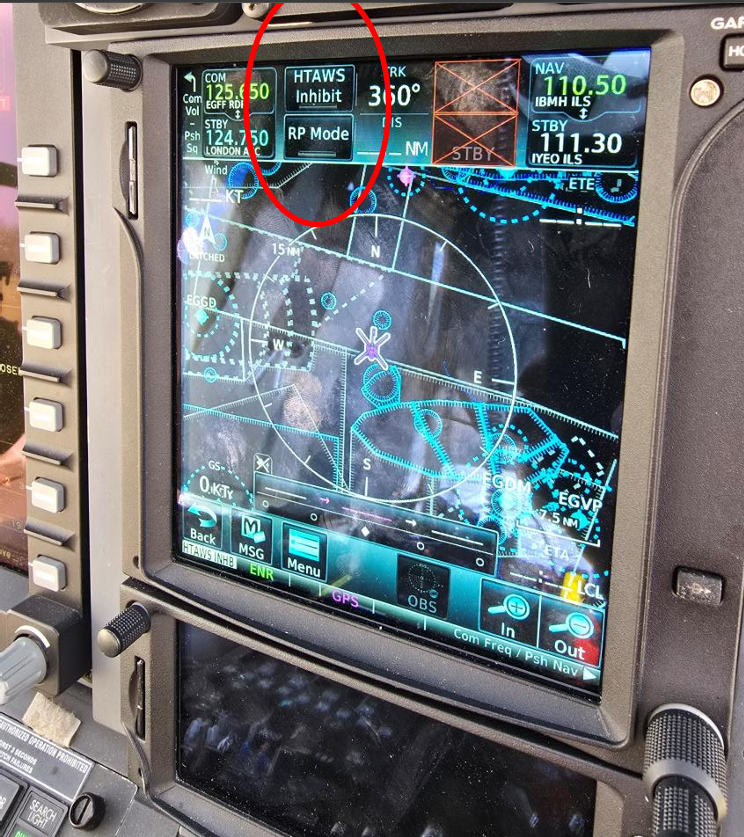
The shortcut options are varied but 2 major time savers for some aircraft types (notably Bell 429 with HTAWS) are the optional HTAWS buttons. These allow the pilot to quickly select HTAWS Terrain Inhibit and HTAWS Reduced Protection modes. The former temporarily disables the forward looking terrain/obstacle avoidance whereas the latter just reduces the alerting thresholds. In both cases they reduce the number of nuisance alerts when operating in close proximity to the ground in visual conditions.
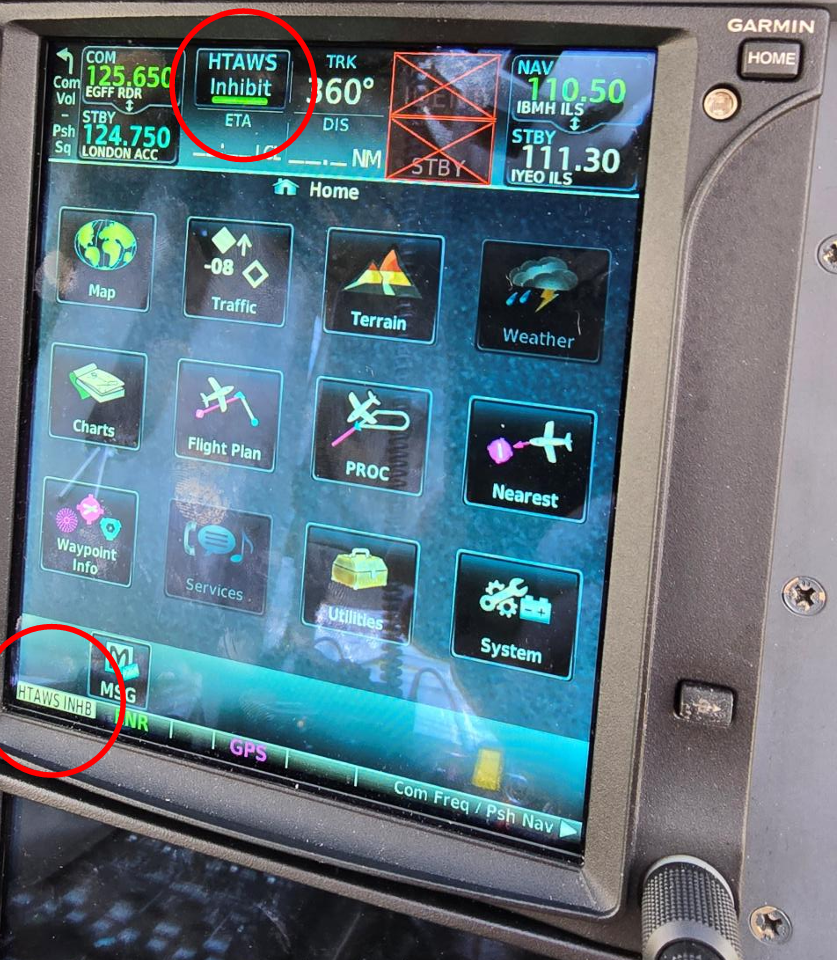
Other options for the boxes are shortcuts to commonly used pages such as the procedure page. This can save an unnecessary change from the map to the main menu. This can be a huge time saver during an inadvertent IMC entry or emergency.
To setup these boxes, select System from the Main Menu then User Waypoints. Of note this box is not on the various GTN simulators (eg on iPad) as they have the intercom system fitted which uses these boxes at the top of the page.
5 – It’s all black
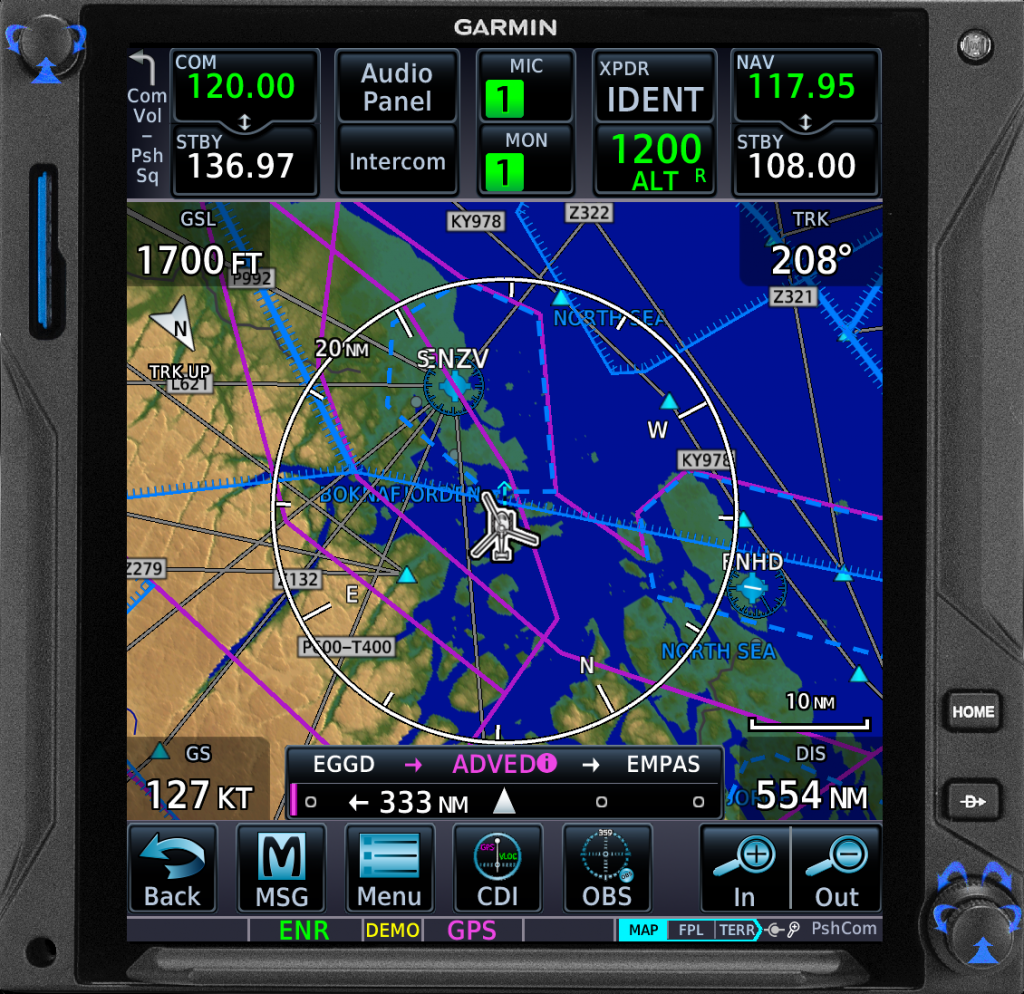
In many modern cockpits Electronic Flight Bags (EFB) navigation solutions are used to supplement the built aircraft navigational equipment such as the GTN. This means that detailed mapping is on the EFB navigation app and the GTN can be decluttered to provide better visual clarity. In addition it lets the pilot exploit an unintended feature of the GTN for low level flight.
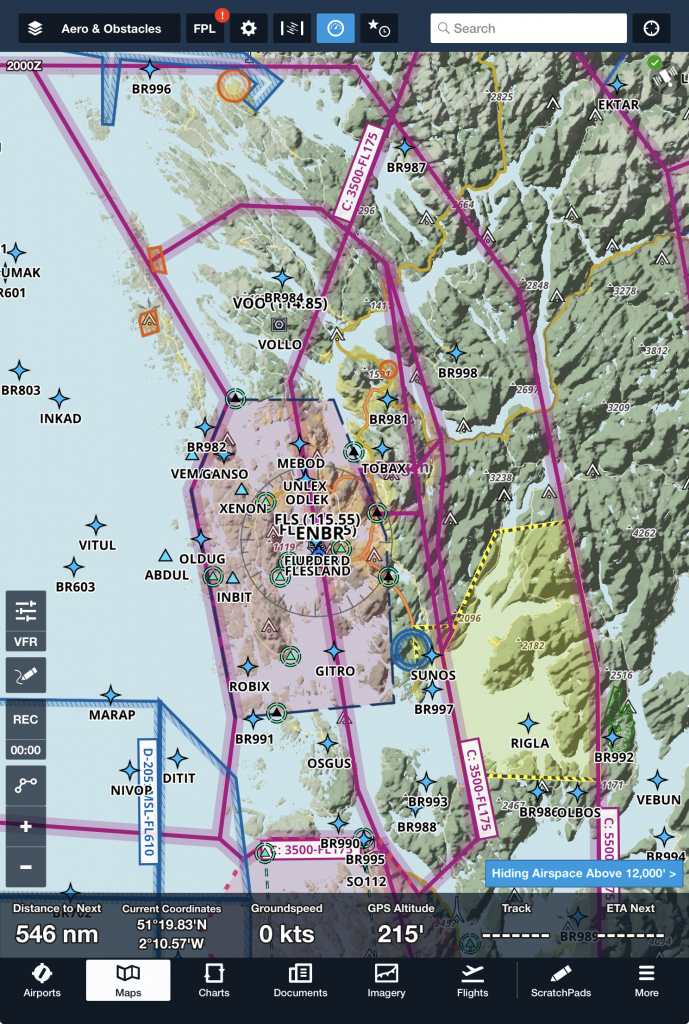
One map overlay option on the GTN series is a terrain overlay. This has several colour graduations. For terrain that is > 500 ft below, the terrain is unshaded. For terrain between -500 ft and -250 ft below the helicopter the shading is green. For terrain up to 250 ft below the terrain is yellow and red indicates the terrain is above the helicopter. This sounds great but the background is crucial.
If the topographical map (TOPO) is also selected on, the green shaded terrain is invisible against the predominantly green TOPO map. This means the terrain >500 ft is hard to pick out. The solution is to remove the TOPO layer. The data is all available on the EFB app and a little magic now happens.
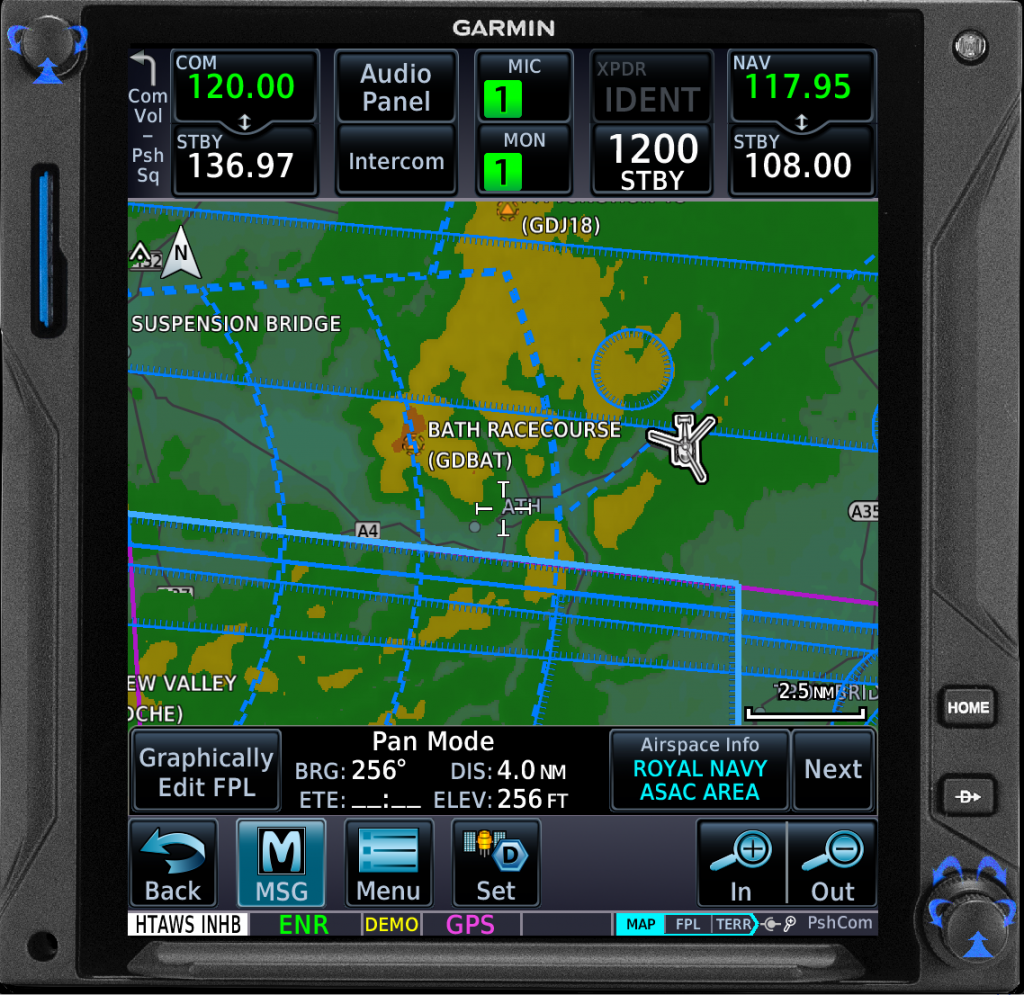
Assuming the pilot is now flying on a marginal weather day with a low overcast. The mission for the day is to get through some terrain to their destination. By switching the terrain map layer on and TOPO off, the pilot know can easily pick out areas on the map that are least 500 ft below them. Should they approach high terrain at cloud base, any black areas in front of them should be safe.
This can allow the pilot to pick out a route through terrain by looking for contiguous line of black. Should the line be interrupted by green, yellow or red, a safe transit is unlikely to be possible. Safe passage is not guaranteed with a black area but it gives the pilot a very good idea.
6 – Third time is not a charm
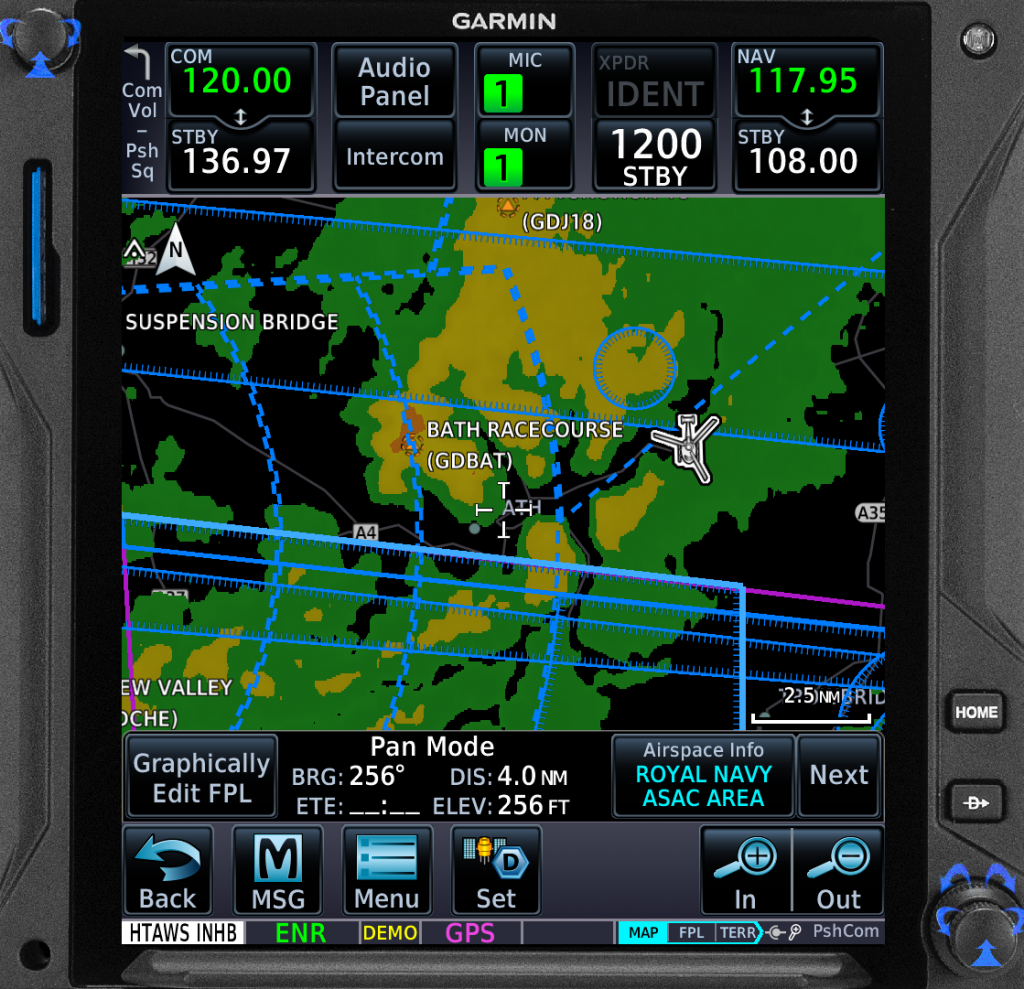
When using the GTN for IFR navigation, a pilot can use the system to programme one approach at a time. However, once the pilot has attempted a hold and is now following the missed approach, the GTN allows the next approach to be loaded.
This capability is brilliant for an unexpected diversion or replan when the expected approach did not work out. However, it is also useful for training when multiple approaches of different types are planned.
Unfortunately in the training scenario there is a little sting in the tail. The GTN are built around operational scenarios, not training. In training, a third approach might be planned which is unlikely in normal operations. Should the pilot try to programme another approach after going around for a 2nd approach and entering the hold, they will find the GTN may refuse to take the next approach. This is very confusing at a high workload part of the flight.
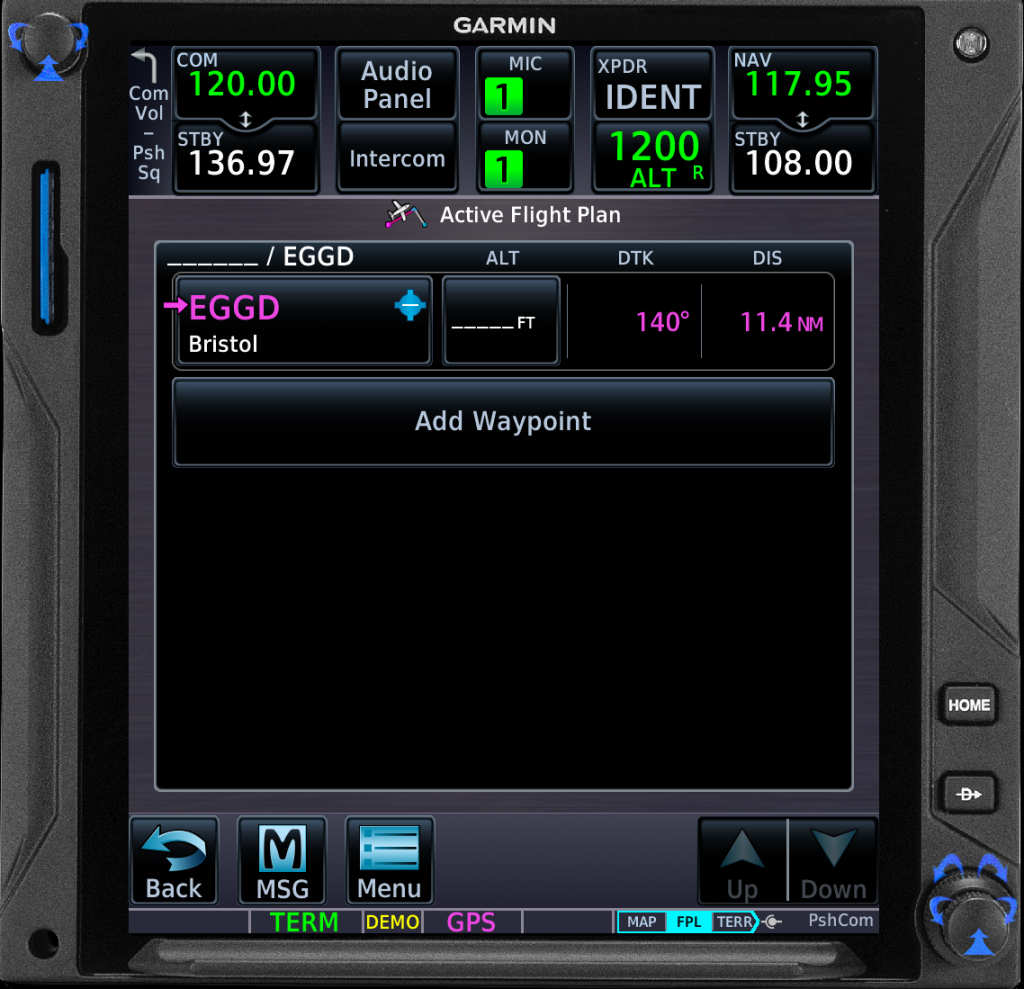
The reason is the GTN can only take 2 approaches in a flight plan at once. The solution is to go into the Flight Plan are delete the first approach by scrolling up the Flight Plan and taping the approach header and pressing delete. Now another approach can be loaded.
7 – Hidden boxes
In a similar vein to the boxes at the top of the GTN we already mentioned above, there a four boxes around the map which can be configured from the same list of options. However, one of these boxes is not quite as useful as it appears.
On later versions of the GTN software, a feature is included which allows the pilot to quickly create guidance for a visual approach to an airfield. This feature automatically is shown when approaching an airfield with the airfield as the active waypoint and <10 nm track miles remain to go.
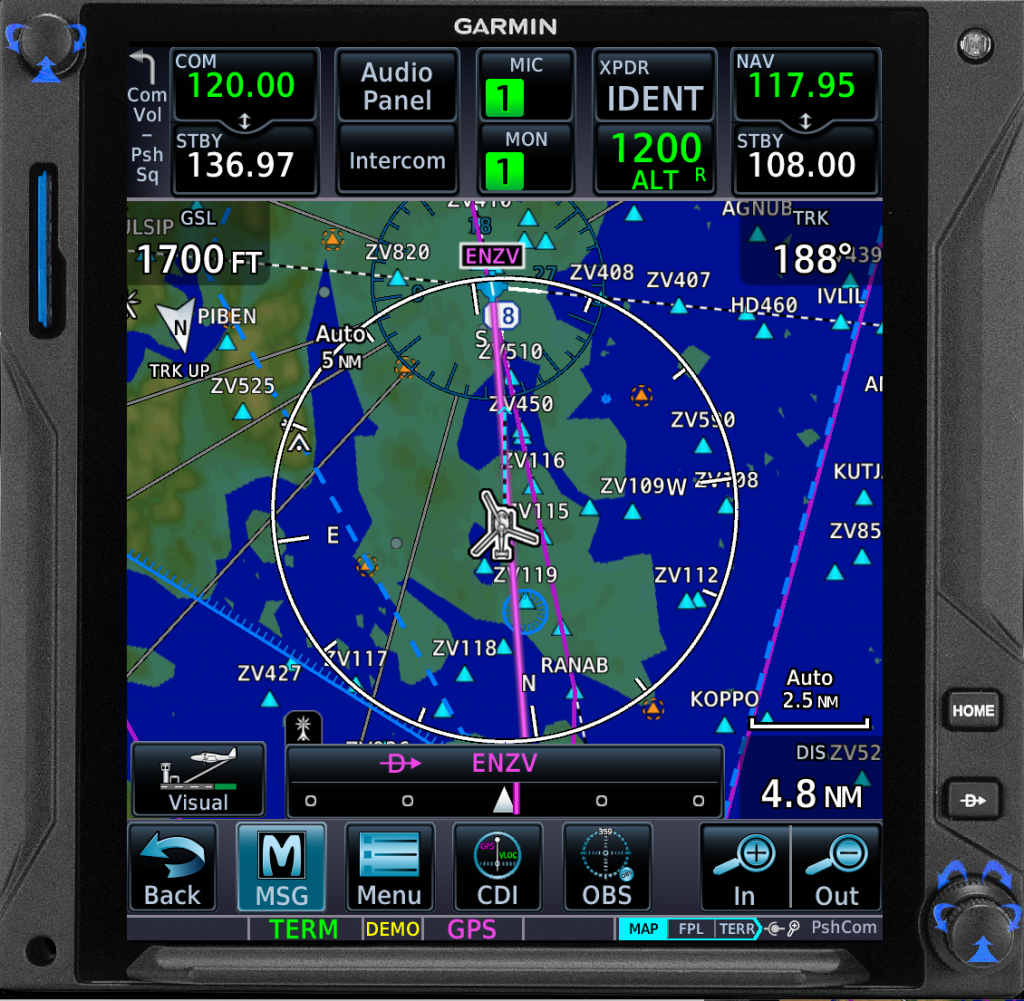
Unfortunately the button to create the guidance for a visual approach appears in place of the bottom left configurable map box. If this has vital data you need as you approach the airfield (eg track) it is suddenly obscured at the critical moment.
In simple terms do not put something important in the bottom left hand corner of the map.
8 – Direct access to procedures
Only many occasions, we have seen pilots enter the ICAO code for an airfield in the Flight Plan page before then opening the Procedures page so they can select the procedures relevant to that airfield. This has the unfortunate side-effect that the aircraft may now steer to the airfield before steering to the initial point of the approach. Pilot intervention is needed to get the flight plan back on track.
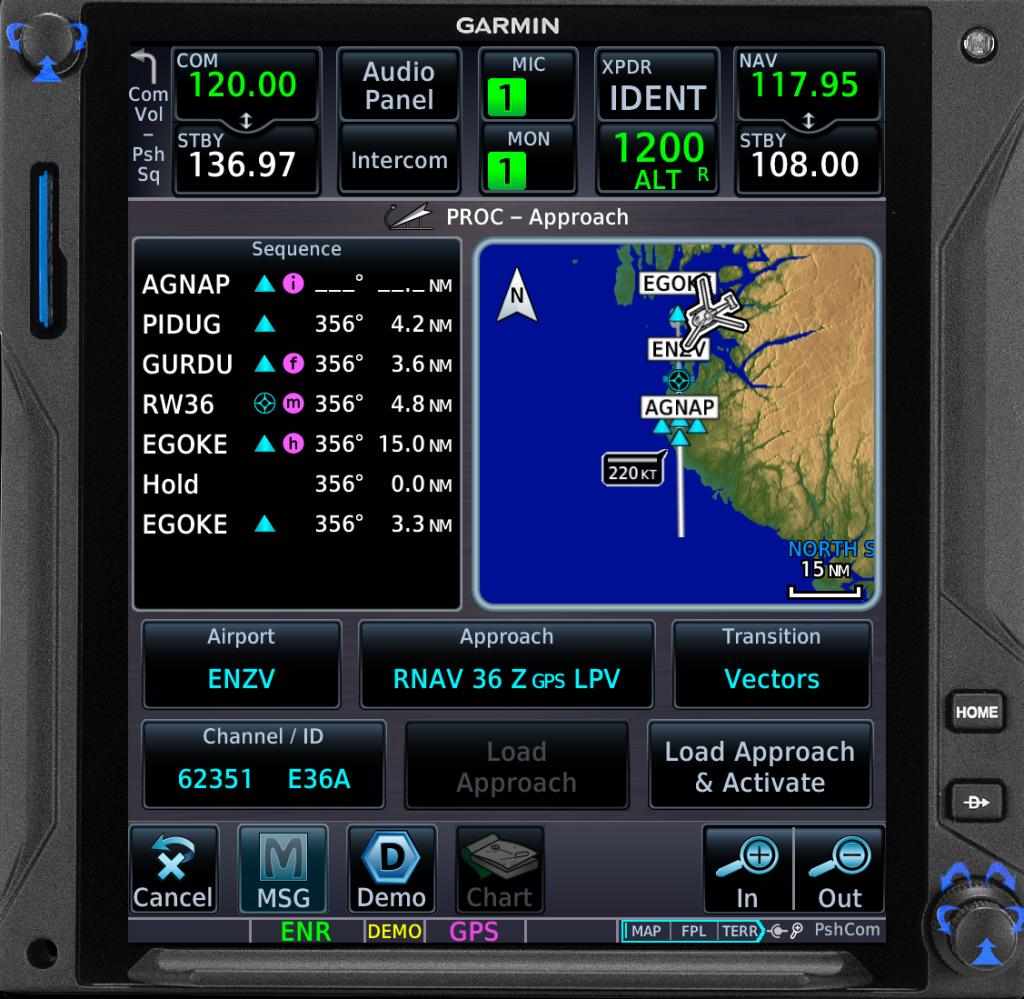
This entry of the ICAO into the flight plan is entirely unnecessary. The pilot can open the Procedures page from the Main Menu and change the ICAO directly on that page.
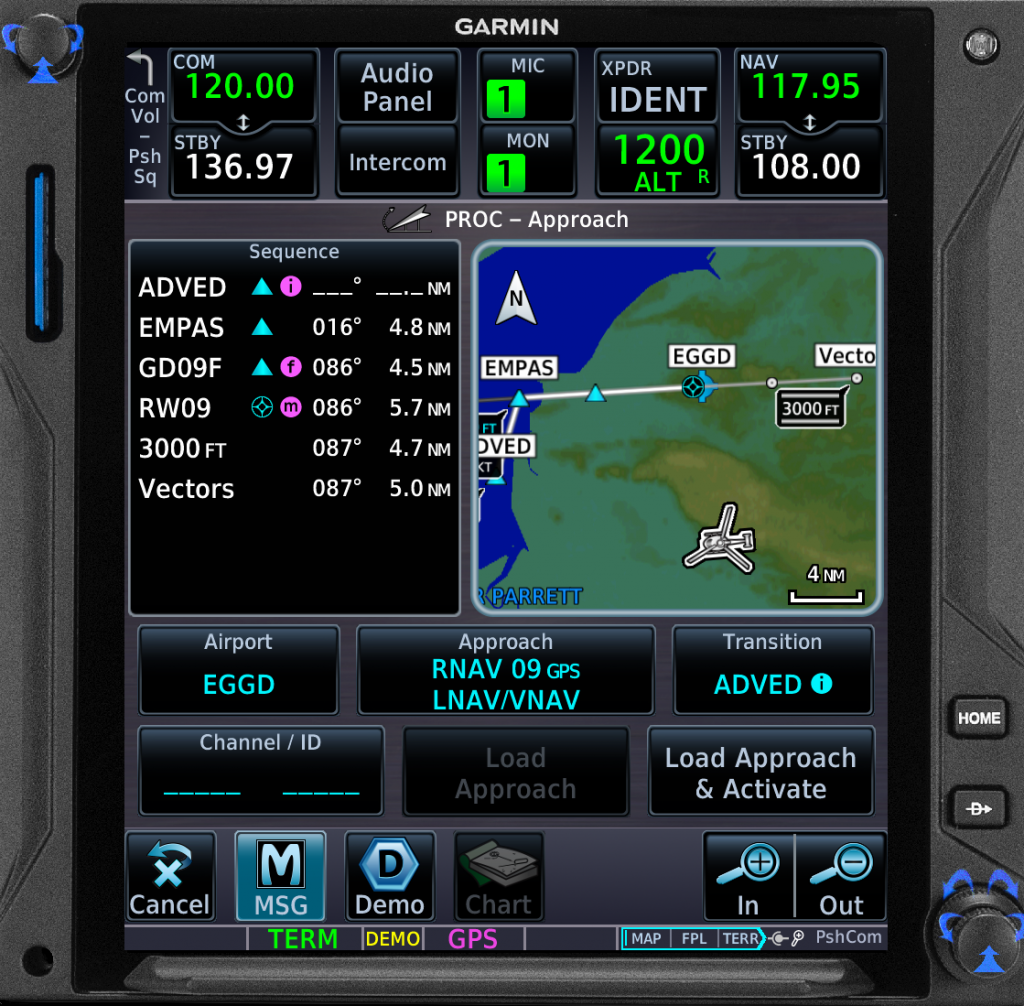
If you are in a country with access to EGNOS and LPV approaches you save even more time by noting the EGNOS Channel Number. You can enter this directly into the procedures page and it will load the exact approach you want without having to select the right ICAO code for the airfield first. For example for the RNP 36 Z at Sola Stavanger (ENZV) you could just enter 62351 in the bottom left box without selecting ENZV first. For more information on EGNOS Channel numbers see here on LinkedIn.
9 – Altitude cross check
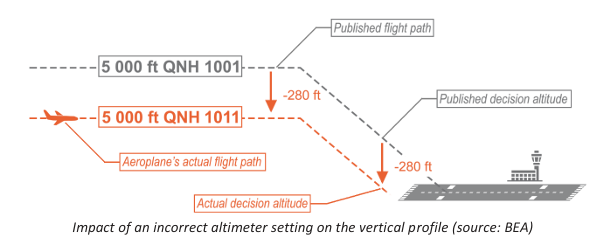
Making an error with the altimeter subscale setting can be fatal. One airliner recently came very close to crashing from just such an error – see the BEA report here. The GTN can actually help in preventing this sort of error by providing a cross check.
The GTN does not calculate altitude using the pitot static system but does have an approximate aircraft altitude through the GNSS system. Whilst this data is not suitable to fly on, it is useful as a gross error check on altimeter settings. However, by default the data is hidden away deep in the bowels of the system.
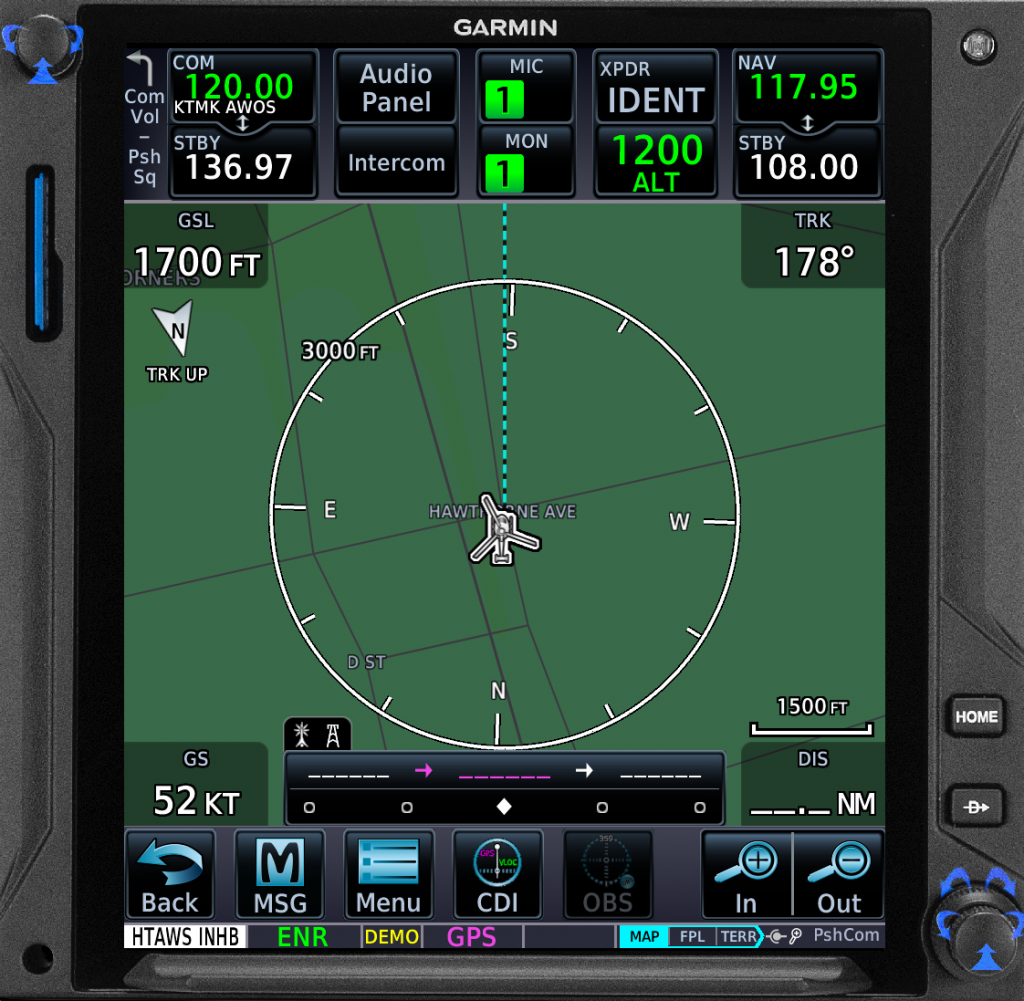
You can bring this data to the fore using the configurable boxes we have already talked about. The ones at the top of screen are probably more useful for this scenario as they are always on screen. The relevant option is GSL. This gives a data block of the aircraft’s GNSS altitude in feet. This is also a really useful data block if using the GTN simulator on iPad where you cannot see an altitude display from normal cockpit instruments.
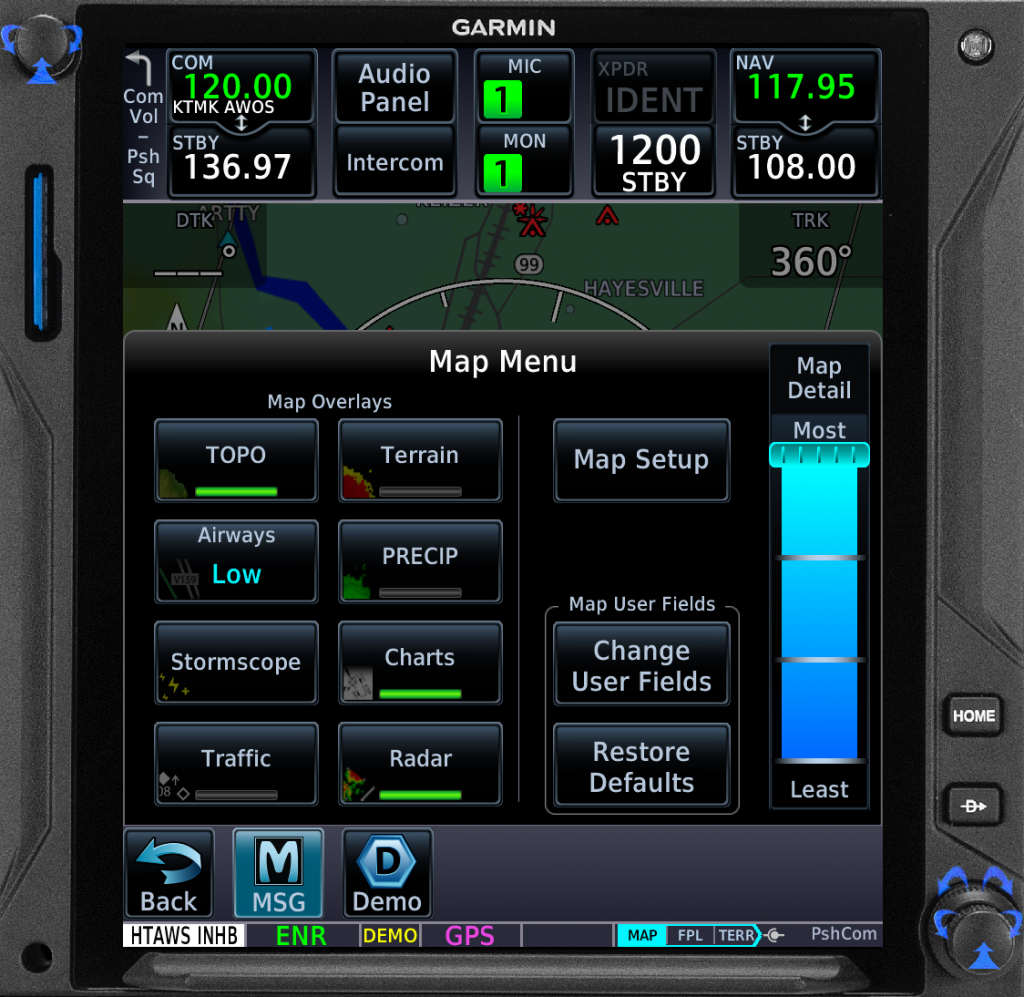
To configure the user fields, from the Map page, select the Menu button. Now select Change User Fields and tap the one you want. Probably not the bottom left one – see above!
10 – Training on PC
Whilst many pilots have used GTN and GTN Xi simulators on iPad as part of their training, there is also a simulator on PC. The PC version has the huge advantage that the GTN can be shown with a cockpit. The cockpits are of course Garmin versions and are unlikely to replicate a pilot’s actual cockpit but they do allow for a better appreciation of what the aircraft is doing. The simple on-screen speed and heading controls are also more intuitive than the menu based controls on iPad. The Garmin Aviation Trainer is available free here.
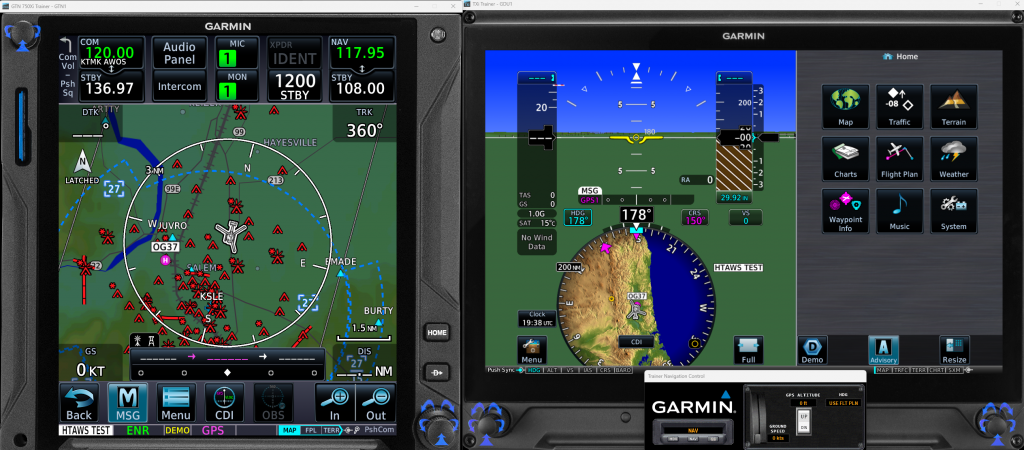
Sadly whilst you can have 2 GTN 750 or 2 GTN 750 Xi you cannot mix and match a 750 with a 750 Xi for comparison.
Summary
So there are 10 tips and tricks for the GTN 750/650 and GTN 750/650 Xi. Hopefully at least one will save you precious seconds allowing you to complete your mission safer and quicker.
Happy flying!
Now check out some other articles…
- Strips vs dials – Which is better?
- Under the weather – are UK HEMS weather rules broken?

- Mastery of the GTN 750 – Ten things you should know
- Checking anomalies – The weird requirements of helicopter proficiency checks

- It’s all about the switch – How helicopter designers need to think about the human in the cockpit
- Engine Failure Training Mode – A safety tool that will punish the unwary
- Automated take offs – Pointless or are they the new standard?

- Keeping up with the Norwegians – Six amazing innovations for UK HEMS
- LNAV/VNAV (SBAS) – Are they approved for use in the UK?
- Helicopter 2D IFR approaches – Is CDFA the best choice?

- Understanding Helicopter Flight Manuals – Everything you need to operate safely

- Post Maintenance Flight Tests – How to avoid fatal traps

Leave a Reply